How to build a pottery kiln

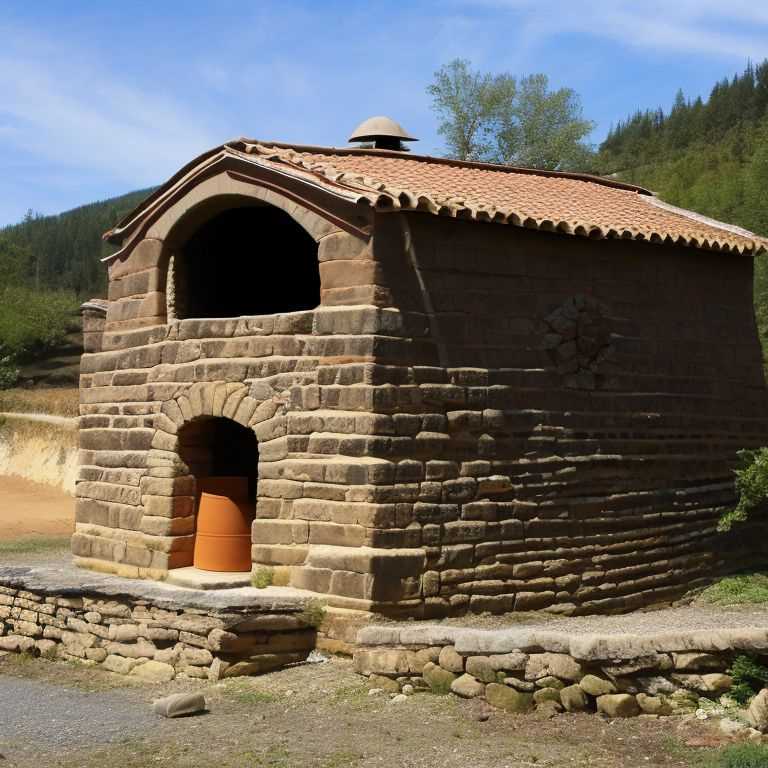
Building a pottery kiln is an exciting project for any pottery enthusiast. A kiln is a furnace used to heat materials to high temperatures to transform them into a more durable substance. In the pottery world, kilns are used to fire clay objects, transforming them from a soft, pliable material into a hard, durable ceramic piece. Building your own pottery kiln is not only a great way to save money, but it is also a way to customize the kiln to meet your specific needs. In this article, we will discuss the steps involved in building a pottery kiln.

1. Determine the Type of Kiln You Want to Build

The first step in building a pottery kiln is deciding what type of kiln you want to build. There are several types of kilns, including electric, gas, and wood-fired kilns. Each type of kiln has its own advantages and disadvantages. Electric kilns are the easiest to use and require the least amount of maintenance, but they can be expensive to operate. Gas kilns are more expensive to build, but they are more efficient and can reach higher temperatures than electric kilns. Wood-fired kilns are the most traditional type of kiln and are favored by many potters for their unique firing results. However, they require a lot of time and effort to build and operate.

2. Gather Materials

Once you have decided on the type of kiln you want to build, the next step is to gather the materials you will need. The materials you will need depend on the type of kiln you are building, but some common materials include bricks, refractory cement, burners, insulation, and thermocouples.

3. Build the Kiln Base

The first step in building your kiln is to build the base. The base should be made of fireproof materials, such as bricks or blocks, and should be sturdy enough to support the weight of the kiln. The size of the base will depend on the size of the kiln you are building.

4. Build the Kiln Walls

The next step is to build the walls of the kiln. The walls should be made of fireproof materials, such as bricks or blocks, and should be at least 3 inches thick. The walls should be built up to a height of at least 3 feet and should be tapered slightly towards the top to help distribute heat evenly.

5. Install the Insulation

After the walls are built, the next step is to install the insulation. The insulation should be placed between the walls and the kiln chamber to help retain heat. The most commonly used insulation material is ceramic fiber, which is easy to install and provides excellent insulation.

6. Install the Burners

If you are building a gas kiln, the next step is to install the burners. The burners should be placed in the base of the kiln and should be spaced evenly around the perimeter. The number of burners you will need depends on the size of the kiln you are building.

7. Install the Thermocouples

The thermocouples are used to monitor the temperature inside the kiln. They should be installed in the walls of the kiln at various heights to ensure accurate temperature readings. The number of thermocouples you will need depends on the size of the kiln you are building.

8. Install the Kiln Shelves

The final step in building your kiln is to install the kiln shelves. The shelves are used to hold the pottery pieces during firing. The shelves should be made of fireproof materials, such as kiln shelves or refractory bricks.

9. Firing the Kiln

Once the kiln is built, you are ready to fire it up! Firing a kiln can be a complex process, and it is important to follow the manufacturer’s instructions carefully. The firing process involves several stages, including preheating, bisque firing, and glaze firing. Each stage requires specific temperatures and firing times, and it is important to monitor the temperature carefully throughout the firing process.

10. Maintenance

After firing, it is important to maintain your kiln to ensure its longevity. Regular maintenance includes cleaning the kiln shelves, replacing damaged bricks, and checking the burners and thermocouples for wear and tear.

Building a pottery kiln is a rewarding project that allows you to customize your kiln to meet your specific needs. It requires careful planning, attention to detail, and a lot of hard work, but the end result is a kiln that you can use for years to come. Whether you choose to build an electric, gas, or wood-fired kiln, the process is similar, and the end result is a beautiful and functional piece of pottery equipment.

Where can i fire my pottery

Pottery is a form of art that has been around for centuries. It involves the creation of clay objects that are then fired in a kiln to harden and become permanent. For many people, pottery is a hobby that allows them to express their creativity and create unique pieces that can be used or displayed. However, one of the biggest challenges for people who are just starting out with pottery is finding a place to fire their creations. In this article, we will explore some of the options available for firing pottery.

Home Kilns

Many people who are serious about pottery invest in a home kiln. A kiln is a special oven that is designed to heat pottery to high temperatures in order to harden it. Home kilns come in a variety of sizes and styles, and they can be purchased from pottery supply stores or online retailers. While a home kiln can be an expensive investment, it can be a great option for people who want to have complete control over the firing process.

Community Centers

Another option for firing pottery is to use a community center or art studio. Many cities have community centers that offer pottery classes and workshops, and they often have kilns available for use by members. Additionally, many art studios offer kiln rentals for people who want to fire their own pieces. This can be a great option for people who don’t want to invest in a home kiln but still want to have control over the firing process.

Pottery Supply Stores

Pottery supply stores are another option for firing pottery. Many of these stores offer kiln rentals and firing services for a fee. This can be a good option for people who don’t have access to a kiln or who don’t want to invest in one. Additionally, pottery supply stores often have knowledgeable staff who can provide advice and guidance on the firing process.

Private Studios

For people who are serious about pottery, private studios can be a great option. Private studios are typically run by professional potters who offer classes, workshops, and kiln rentals. These studios often have top-of-the-line equipment and tools, and they can provide a supportive community for people who are passionate about pottery. Private studios can be expensive, but they can be a great investment for people who want to take their pottery to the next level.

Online Firing Services

There are online firing services that allow people to send their pottery to be fired by professionals. These services typically require people to ship their pottery to the service provider, who will then fire the pieces and ship them back. While this option can be convenient, it can also be expensive and risky. Shipping pottery can be risky, as pieces can break or become damaged in transit. Additionally, people who use online firing services may not have complete control over the firing process, which can lead to unexpected results.

There are many options available for firing pottery. Home kilns, community centers, pottery supply stores, private studios, and online firing services all offer different advantages and disadvantages. Ultimately, the best option will depend on a person’s individual needs and preferences. Whether someone is just starting out with pottery or is a seasoned professional, there is sure to be a firing option that will meet their needs. With a little research and some careful consideration, anyone can find a place to fire their pottery and create beautiful, lasting pieces of art.

How to fire pottery without a kiln

Pottery is one of the oldest art forms in human history. It has been a popular hobby for centuries, with many people finding great joy in creating beautiful and functional pottery pieces. However, if you do not have access to a kiln, it can be challenging to fire your pottery pieces. In this article, we will explore several methods for firing pottery without a kiln.

Method 1: Pit Firing

Pit firing is one of the oldest methods of firing pottery. It involves digging a pit in the ground and building a fire inside it. The pottery is then placed on top of the fire and covered with materials such as sawdust, leaves, or straw. The fire is allowed to burn for several hours, and once it has burned out, the pottery is left to cool down.

To start pit firing, you will need to choose an appropriate location for your pit. It should be away from any flammable materials, and the ground should be free from any rocks or debris. You will also need to gather materials such as sawdust, leaves, or straw to cover your pottery.

Once you have dug your pit and built your fire, place your pottery on top of the fire. Be sure to leave enough space between each piece to allow for even heating. Then, cover the pottery with your chosen materials. You may need to add more materials as the fire burns down to ensure the pottery remains covered.

After several hours, the fire will burn out, and the pottery will be left to cool. Once it has cooled down completely, you can remove it from the pit and clean it thoroughly.

Method 2: Raku Firing

Raku firing is a popular method of firing pottery that does not require a kiln. It involves heating the pottery quickly to a high temperature and then removing it from the heat source to cool down rapidly. This process creates unique patterns and colors on the pottery, making it a popular choice for decorative pieces.

To start raku firing, you will need a propane or gas burner and a metal container with a lid, such as a trash can. You will also need to prepare your pottery by glazing it with a special raku glaze that can withstand rapid temperature changes.

Once your pottery is glazed and ready to fire, place it in the metal container and heat it with the propane or gas burner. Once the pottery has reached the desired temperature, remove it from the heat source and place it in a container filled with combustible materials such as sawdust or newspaper. The combustible materials will catch fire, creating unique patterns and colors on the pottery.

After the pottery has cooled down, it can be removed from the container and cleaned thoroughly.

Method 3: Bonfire Firing

Bonfire firing is another popular method of firing pottery without a kiln. It involves building a large bonfire and placing the pottery in the fire. The fire is allowed to burn down, and once it has cooled, the pottery can be removed and cleaned.

To start bonfire firing, you will need to choose an appropriate location for your bonfire. It should be away from any flammable materials and large enough to accommodate your pottery pieces. You will also need to gather materials such as wood and kindling to build your fire.

Once your fire is built, place your pottery on top of the fire. Be sure to leave enough space between each piece to allow for even heating. The fire should be allowed to burn down completely before removing the pottery from the fire.

After the fire has cooled down, the pottery can be removed and cleaned thoroughly.

Firing pottery without a kiln is possible using various methods such as pit firing, raku firing, and bonfire firing. Each method requires different materials and techniques, but they all produce unique and beautiful results. It is important to take safety precautions when firing pottery and to follow the instructions carefully to ensure the best results. With a little practice and patience, anyone can create beautiful pottery pieces without a kiln.

How to make pottery in little alchemy

Pottery is a beautiful art form that has been practiced for thousands of years. It involves creating beautiful and functional objects using clay and other materials. With the advent of technology and digital games, it is now possible to make pottery in Little Alchemy, a popular game that involves combining elements to create new elements and objects. In this article, we will explore how to make pottery in Little Alchemy.

First, it is important to understand the basics of Little Alchemy. The game involves combining basic elements to create new objects. For example, combining water and fire will create steam, while combining water and earth will create mud. The game has over 500 elements that can be combined to create new objects. The ultimate goal is to create all the elements in the game.

To make pottery in Little Alchemy, you will need to combine a few elements. The first element you will need is clay. Clay is a basic element in the game and can be created by combining mud and sand. Once you have clay, the next step is to create a kiln. A kiln is a type of oven that is used to bake pottery. To create a kiln, you will need to combine fire and brick. Once you have a kiln, you can begin making pottery.

To create pottery, you will need to combine clay and water in a bowl. This will create a lump of clay that can be shaped into a pottery object. To shape the clay, you can use your mouse to drag and drop the clay into different shapes. You can create a variety of pottery objects, such as vases, bowls, and plates.

Once you have shaped the clay into the desired object, you will need to bake it in the kiln. To do this, drag and drop the clay object into the kiln. The kiln will then heat up and bake the clay object. After a few seconds, the pottery object will be ready. You can then drag and drop it onto the screen to add it to your collection.

It is important to note that making pottery in Little Alchemy is not just about combining elements. It is also about creativity and imagination. You can experiment with different shapes and designs to create unique and beautiful pottery objects. You can also combine different elements to create different types of clay, such as red clay or white clay. This will give your pottery objects a unique look and feel.

In addition to making pottery, you can also combine pottery with other elements to create new objects. For example, combining pottery and water will create a vase, while combining pottery and fire will create a pot. This adds another level of creativity to the game and allows you to create a variety of objects.

One thing to keep in mind when making pottery in Little Alchemy is that it takes time and patience. You will need to experiment with different combinations and shapes to create the perfect pottery object. It is also important to be careful when dragging and dropping the clay so that you do not accidentally delete it.

Making pottery in Little Alchemy is a fun and creative activity that allows you to experiment with different shapes and designs. It involves combining basic elements to create clay, a kiln, and pottery objects. With a little patience and imagination, you can create unique and beautiful pottery objects that will add to your collection in the game. So, grab your mouse and start making pottery in Little Alchemy today!

How to glaze pottery without a kiln

Pottery is an ancient and beautiful art form that has been enjoyed by people for thousands of years. Glazing is an important step in pottery making, as it not only adds color and shine to the finished piece, but also helps to protect it from damage. Traditionally, glazing is done in a kiln, which can be expensive and inaccessible for some people. However, it is possible to glaze pottery without a kiln using a few simple techniques.

One of the easiest and most accessible ways to glaze pottery without a kiln is to use a glaze that can be fired in a low-temperature oven. These types of glazes are often called low-fire or earthenware glazes, and they are designed to be fired at temperatures between 1,000 and 1,200 degrees Fahrenheit. While this is still a high temperature, it can be achieved in a standard kitchen oven.

To use a low-fire glaze, start by cleaning and drying your pottery thoroughly. Then, apply the glaze to the surface of the pottery using a brush, sponge, or spray bottle. Be sure to apply the glaze evenly and avoid leaving any spots or streaks. Once the glaze is applied, let it dry completely before firing.

To fire your pottery in a kitchen oven, start by preheating the oven to the temperature specified by the glaze manufacturer. Then, place your pottery on a baking sheet or in a ceramic dish and put it in the oven. It is important to note that you should never put cold pottery into a hot oven, as this can cause it to crack or break. Instead, let the pottery heat up slowly as the oven warms up.

Once the oven reaches the desired temperature, let the pottery bake for the amount of time specified by the glaze manufacturer. This is usually between 30 minutes and an hour, depending on the size of the pottery and the thickness of the glaze. After the baking time is up, turn off the oven and let the pottery cool down completely before removing it.

Another way to glaze pottery without a kiln is to use a non-fired glaze, also known as a cold glaze or acrylic glaze. These types of glazes do not require firing and can be applied directly to the surface of the pottery. While they do not provide the same level of protection as fired glazes, they are a great option for decorative pieces or pieces that will not be used for food or drink.

To use a non-fired glaze, start by cleaning and drying your pottery thoroughly. Then, apply the glaze to the surface of the pottery using a brush, sponge, or spray bottle. Be sure to apply the glaze evenly and avoid leaving any spots or streaks. Once the glaze is applied, let it dry completely before handling or displaying your pottery.

While non-fired glazes do not require firing, they may still need to be cured or sealed to protect them from damage. This can be done by applying a clear coat of sealant or by curing the glaze in the sun or under a UV light. Always follow the manufacturer’s instructions for curing or sealing your non-fired glaze.

Another way to glaze pottery without a kiln is to use a pit firing technique. This is a traditional method of firing pottery that has been used for centuries by indigenous cultures around the world. To pit fire your pottery, start by digging a hole in the ground and lining it with combustible materials such as sawdust, straw, or leaves. Then, place your pottery on top of the combustible materials and cover it with more combustible materials, such as wood or charcoal.

Next, light the combustible materials on fire and let the fire burn down until it goes out. This will create a smoky, ash-filled environment that will cause the pottery to change color and develop a unique, rustic finish. Once the fire is out, let the pottery cool down completely before removing it from the pit.

While pit firing can be a fun and unique way to glaze pottery, it is important to note that it is not a precise or reliable method. The results can vary greatly depending on the materials used, the temperature of the fire, and the duration of the firing. It is also important to take safety precautions when pit firing, such as wearing protective clothing and keeping a fire extinguisher nearby.

Glazing pottery without a kiln is possible using a few simple techniques. Whether you choose to use a low-fire glaze, a non-fired glaze, or a pit firing technique, be sure to follow the manufacturer’s instructions and take safety precautions. With a little creativity and experimentation, you can create beautiful and unique pottery that will be admired for years to come.

How to make pottery without a kiln

Pottery has been a fundamental part of human civilization for thousands of years, and it still holds a special place in the hearts of many people today. Unfortunately, not everyone has access to a kiln, which is necessary for firing pottery. However, there are several ways to make pottery without a kiln, whether you are a beginner or an experienced potter. In this article, we will explore some of the methods you can use to create beautiful pottery without a kiln.

Method 1: Air Dry Clay

Air dry clay is a popular and accessible material that can be used to make pottery without a kiln. It is a type of clay that hardens when left to dry in the air, without the need for firing. Air dry clay can be purchased from most craft stores, or you can make it yourself using simple ingredients such as flour, salt, and water.

To make air dry clay pottery, start by choosing a design or shape you want to create. Roll out the air dry clay to the desired thickness using a rolling pin or your hands. Then, use your fingers, tools, or molds to shape the clay into your desired form. Once you have finished shaping the clay, set it aside to dry. The drying time will vary depending on the thickness of the clay and the humidity of your environment. Generally, air dry clay takes around 24 hours to harden completely.

After the clay has dried, you can sand it to smooth out any rough edges or imperfections. You can also paint or decorate the pottery with acrylic paint, markers, or other materials.

Method 2: Oven-Baked Clay

Another method for making pottery without a kiln is using oven-baked clay. Oven-baked clay is a type of polymer clay that can be baked in a regular oven to harden it. It is a durable and versatile material that comes in a range of colors and can be shaped and molded like traditional clay.

To make oven-baked clay pottery, start by choosing the color and type of clay you want to use. Knead the clay to soften it and remove any air bubbles. Then, shape the clay into your desired form using your hands, tools, or molds. Once you have finished shaping the clay, place it on a baking sheet lined with parchment paper.

Preheat your oven to the temperature specified on the clay packaging, usually around 275°F to 300°F. Bake the pottery in the oven for the amount of time specified on the package, usually around 15 to 30 minutes. Be sure to check on the pottery frequently to ensure it is not burning or cracking.

After the pottery has finished baking, let it cool completely on the baking sheet. Once it has cooled, you can sand it to smooth out any rough edges or imperfections. You can also paint or decorate the pottery with acrylic paint, markers, or other materials.

Method 3: Raku Firing

Raku firing is a traditional Japanese pottery technique that involves firing pottery in a small, portable kiln. Raku firing produces unique and beautiful pottery with a crackled glaze and metallic finish. Raku firing can be done outdoors, making it a great option for those without access to a traditional kiln.

To make Raku pottery, start by creating your piece using a traditional pottery technique such as hand-building or wheel-throwing. Once your piece is complete, let it dry completely. Then, apply a Raku glaze to the pottery. Raku glazes are specially formulated to produce unique effects during firing, such as crackling and metallic finishes.

Next, place the pottery in a small, portable kiln called a Raku kiln. Raku kilns are typically made of metal and can be fueled by propane or natural gas. Heat the kiln to around 1800°F to 2000°F and let the pottery heat up. Once the pottery is heated, carefully remove it from the kiln using tongs and place it in a container filled with combustible materials such as sawdust or newspaper.

The combustible materials will ignite and create smoke, which will react with the glaze to produce unique effects. Once the pottery has cooled, you can remove it from the container and clean it to reveal the finished product.

Pottery is a timeless art form that can be enjoyed by people of all ages and skill levels. While a kiln is necessary for traditional pottery firing, there are several ways to make pottery without a kiln. Whether you choose to use air dry clay, oven-baked clay, or Raku firing, the key is to have fun and experiment with different techniques and designs. By following these methods, you can create beautiful and unique pottery pieces that you will be proud to display in your home or give as gifts.

How much is a pottery kiln

Pottery making is an ancient art that requires skill, creativity, and patience. For those who are passionate about it, investing in a pottery kiln is a must. A kiln is a specialized oven used to fire clay at high temperatures, transforming it into a hard and durable material. But how much does a pottery kiln cost? In this article, we will explore the different types of kilns, their prices, and what factors affect their cost.

Types of Pottery Kilns

There are several types of pottery kilns available on the market, each with its own unique features and price range. The most common types of pottery kilns include electric, gas, and wood-fired kilns.

Electric Kilns

Electric kilns are the most popular type of kiln for home potters. They are easy to use, require less maintenance, and are cost-effective. Electric kilns come in different sizes, ranging from small tabletop models to larger stand-alone models. The price of an electric kiln can range from a few hundred dollars to several thousand dollars, depending on its size and features.

Gas Kilns

Gas kilns are another popular type of kiln used by potters. They are known for their efficiency and the quality of their firing. Gas kilns use natural gas or propane as a fuel source and are recommended for larger pottery projects due to their size and the amount of heat they can generate. The price of a gas kiln can range from $2,000 to $10,000, depending on its size and features.

Wood-Fired Kilns

Wood-fired kilns are the traditional kilns used by potters for thousands of years. They are known for their unique firing process and the quality of their pottery. Wood-fired kilns use wood as a fuel source and require a significant amount of skill and experience to operate. The price of a wood-fired kiln can range from $5,000 to $20,000, depending on its size and features.

Factors that Affect the Cost of a Pottery Kiln

Now that we have explored the different types of pottery kilns, let’s take a closer look at the factors that affect their cost.

Size

The size of a pottery kiln is one of the most significant factors that affect its cost. Generally, the larger the kiln, the more expensive it is. A small tabletop electric kiln can cost as little as $200, while a large wood-fired kiln can cost upwards of $20,000.

Features

The features of a pottery kiln can also affect its cost. Some kilns come with advanced features such as digital controls, automatic firing, and cooling systems. These features can significantly increase the cost of a kiln. However, they also provide more control and precision over the firing process, resulting in higher quality pottery.

Brand

The brand of a pottery kiln is another factor that can affect its cost. Some brands are known for their quality and reliability, while others are more affordable but may not be as durable. It’s essential to research different brands and read reviews before investing in a kiln to ensure you’re getting the best value for your money.

Used or New

Another factor that can affect the cost of a pottery kiln is whether it’s used or new. Used kilns can be significantly cheaper than new ones, but they may not come with a warranty or be in the best condition. New kilns, on the other hand, can be more expensive but come with a warranty and are often in better condition.

The cost of a pottery kiln can vary significantly depending on its type, size, features, brand, and whether it’s new or used. It’s essential to consider these factors carefully before investing in a kiln to ensure you’re getting the best value for your money. While a pottery kiln can be a significant investment, it’s also an essential tool for any potter looking to take their craft to the next level. So, how much is a pottery kiln? It depends on the kiln’s type, size, and features, but you can expect to pay anywhere from a few hundred dollars to tens of thousands of dollars.

How hot does a pottery kiln get

Pottery kilns are essential tools used in creating ceramic arts. Kilns are used to shape and form clay into beautiful works of art. The firing process in the kiln is a critical step in the creation of pottery, and it is important to know how hot a pottery kiln can get to ensure the best results. In this article, we will explore the different types of pottery kilns and the temperatures they can reach.

Pottery kilns come in different shapes and sizes, and each type has its own unique temperature range. The most common types of pottery kilns are electric kilns, gas kilns, and wood-fired kilns. Electric kilns are the most popular type of pottery kiln, and they are easy to use and maintain. They are powered by electricity and can reach temperatures up to 2350°F (1287°C). Electric kilns are ideal for small to medium-sized pottery projects and are perfect for beginners.

Gas kilns are another type of pottery kiln. They are powered by gas and can reach temperatures up to 2400°F (1316°C). Gas kilns are ideal for larger pottery projects and are often used by professional potters. They are more expensive than electric kilns, but they are more energy-efficient and can produce higher quality pottery.

Wood-fired kilns are the oldest type of pottery kiln and are still used today. They are powered by wood and can reach temperatures up to 2400°F (1316°C). Wood-fired kilns are the most expensive type of pottery kiln, but they are ideal for creating large and unique pieces of pottery. They are often used by artists who want to create one-of-a-kind pieces of pottery.

The temperature range of a pottery kiln depends on the type of kiln and the type of clay being fired. Different types of clay require different firing temperatures to achieve the desired results. For example, earthenware clay is fired at a lower temperature than porcelain clay. Earthenware clay is fired at temperatures between 1700°F (927°C) and 2000°F (1093°C), while porcelain clay is fired at temperatures between 2200°F (1204°C) and 2400°F (1316°C).

The temperature of a pottery kiln is measured using a pyrometer. A pyrometer is a device used to measure the temperature of the kiln. It is important to monitor the temperature of the kiln throughout the firing process to ensure that the pottery is fired correctly. If the temperature is too low, the pottery will not be fully fired, and if the temperature is too high, the pottery will be over-fired and may crack or break.

The firing process in a pottery kiln is a complex process that involves several stages. The first stage is called the bisque firing. The bisque firing is done at a lower temperature, usually between 1700°F (927°C) and 2000°F (1093°C). This stage is done to remove any moisture from the clay and to harden the clay. Once the bisque firing is complete, the pottery is ready for glazing.

The second stage is the glaze firing. The glaze firing is done at a higher temperature, usually between 2200°F (1204°C) and 2400°F (1316°C). The glaze firing is done to melt the glaze and fuse it to the pottery. The glaze firing is a critical step in the creation of pottery, and it is important to monitor the temperature of the kiln throughout the firing process.

Pottery kilns are essential tools in the creation of ceramic arts. They come in different shapes and sizes and can reach different temperature ranges. The most common types of pottery kilns are electric kilns, gas kilns, and wood-fired kilns. Each type of kiln has its own unique temperature range, and the temperature range depends on the type of clay being fired. It is important to monitor the temperature of the kiln throughout the firing process to ensure that the pottery is fired correctly. Understanding how hot a pottery kiln can get is essential in creating beautiful pieces of pottery.

Where can i get my pottery fired

Pottery has a long and rich history that dates back thousands of years. From the earliest clay vessels to the intricately decorated pottery of ancient civilizations, the art of making pottery has always been an important aspect of human culture. If you have recently taken up pottery as a hobby or are an experienced potter looking for a place to fire your pieces, you may be wondering where you can get your pottery fired.

There are several options available to you, depending on your location and the resources available in your area. Here are some of the most common places to get your pottery fired:

1. Community Centers and Art Studios Continue reading “Where can i get my pottery fired”

Pottery Kilns Through The Years

It is the biggest investment a potter has to make. But which type of kiln should you buy Good question. In this article, I will take a closer look at various types of pottery kilns available and a history of how pottery kilns were used. Potters must be particularly cautious when using glazes, though, because many of them contain lead. This makes them toxic, which is why not all types of pots and clay vessels are suitable for use for eating or drinking. Perfecting the combination of throwing, decorating, glazing and firing is truly the result of years and years of practice.

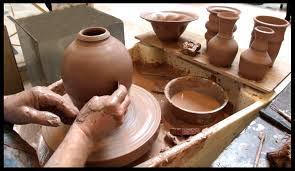
Mexican pottery sometimes takes on the shape of whatever the artist happens to fancy at the moment, depending of course on how seriously the artist takes him or herself. If you are in the mood to collect some of the mythical creatures of Mexican folklore, chances are that you can find a potter that will incorporate these beasts into his or her work (for the right price of course). There have been some quite famous pieces that have been completely whimsical in nature and serve as a great reminder that we really should avoiding taking our lives and ourselves so seriously all the time.

Continue reading “Pottery Kilns Through The Years”